Making a peanut butter sandwich is one of the easiest meals you can prepare. It’s perfect for lunch, snacks, or even a quick breakfast. This simple food has been loved by people for over 100 years.
According to Epicurious, the first peanut butter and jelly sandwich recipe appeared in 1901. Today, Americans eat about 3 billion of these sandwiches every year. Let’s learn how to make your own perfect peanut butter sandwich.
Quick Summary Card
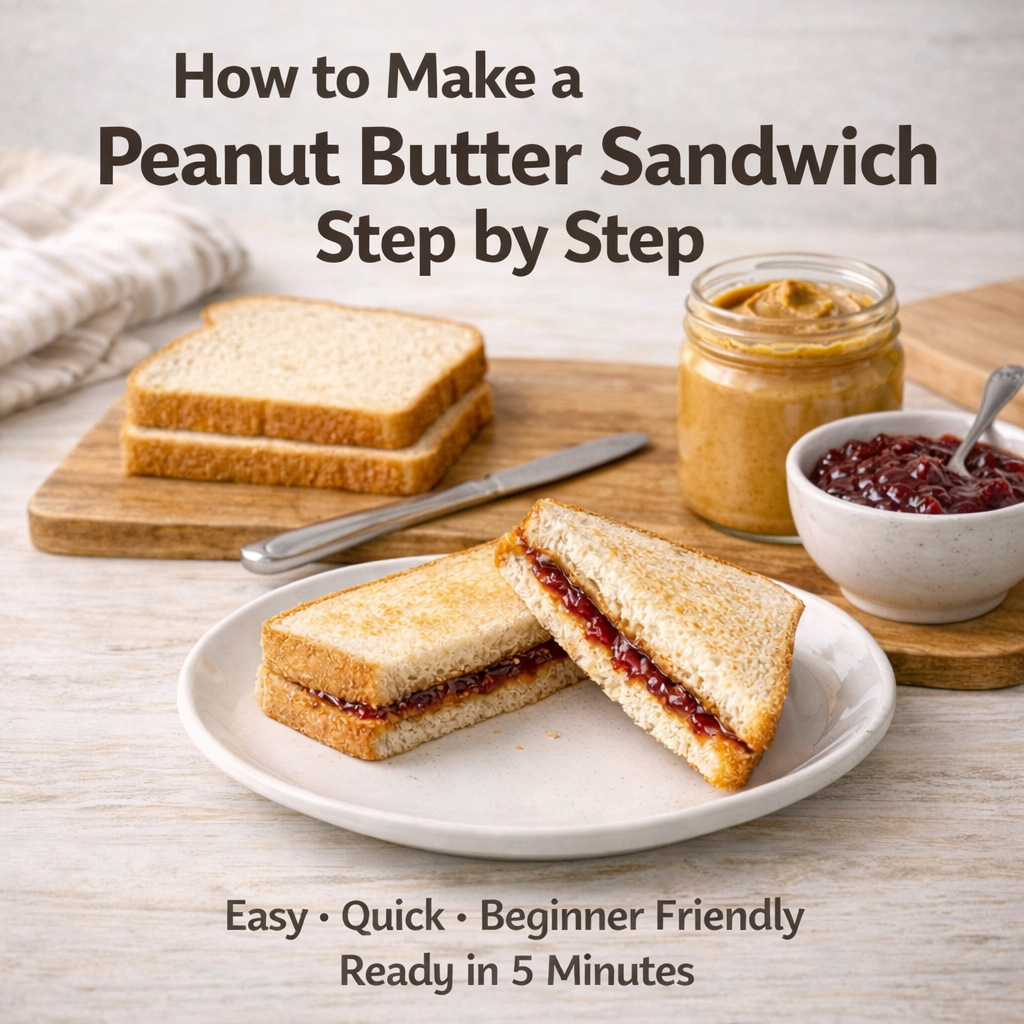
The Perfect Peanut Butter Sandwich
Classic Lunch • 5-Min Prep • Family FavoriteStep-by-Step Guide
-
1. Prepare the Base Place two slices of fresh bread flat on a clean plate.
-
2. Spread the Peanut Butter Using a butter knife, spread about 2 tbsp of peanut butter from the middle outward to the edges.
-
3. Add Sweetness (Optional) Spread jelly or jam on the second slice of bread, or add toppings like apple or banana slices.
-
4. Assemble & Serve Press the two slices together gently. Cut in half or into triangles and serve immediately!
What You’ll Need?
Ingredients
Making this sandwich requires just a few simple items. You probably have everything in your kitchen already.

Here’s what to gather:
- Two slices of bread (white, wheat, or your favorite kind)
- 2 tablespoons of peanut butter (creamy or crunchy)
- Optional: 1-2 tablespoons of jelly or jam
According to Serious Eats, using about 2 tablespoons of peanut butter gives you the perfect balance. Too much will ooze out when you bite.
Equipment Needed
You don’t need fancy tools for this recipe. A basic kitchen setup works perfectly.
Grab these items:
- A butter knife or spreading knife
- A clean plate
- A cutting board (optional)
The Kitchn recommends using a butter knife with a rounded edge. It spreads easier and won’t tear your bread.
Ingredient Options and Substitutions
| Ingredient Type | Options | Best For |
|---|---|---|
| Bread | White, wheat, sourdough, bagel | White is classic, wheat is healthier |
| Peanut Butter | Creamy, crunchy, natural | Creamy spreads easier, crunchy adds texture |
| Sweet Addition | Grape jelly, strawberry jam, honey | Grape is traditional, honey is natural |
| Extra Toppings | Banana slices, bacon, apple slices | Banana adds vitamins, bacon adds protein |
Substitution ideas from Taste of Home and Reddit r/Cooking
Step-by-Step Instructions

Step 1: Get Everything Ready
Start by washing your hands with soap and water. According to FDA food safety guidelines, clean hands prevent germs from getting on your food.
Place your two bread slices on a clean plate. Make sure they’re lying flat and ready to use.
Step 2: Open Your Peanut Butter
Twist the lid off your peanut butter jar. If it’s a new jar, you might need to peel off a safety seal first.
Use your knife to scoop out about 2 tablespoons. Serious Eats tested different amounts and found this creates the best flavor without making a mess.
Step 3: Spread the Peanut Butter
Place your knife on one bread slice. Start in the middle and spread the peanut butter outward.
According to advice from Reddit r/explainlikeIAmA, spreading all the way to the edges prevents the bread from getting soggy later. Cover the whole slice evenly.
Step 4: Add Jelly (If Using)
If you want jelly, spread it on the second slice of bread. Use a clean knife or wipe off your first knife.
Spread it the same way you did the peanut butter. Go from the middle to the edges for even coverage.
Step 5: Put the Slices Together
Pick up one slice of bread carefully. Flip it over onto the other slice so the peanut butter and jelly touch.
Press down gently with your hand. This helps them stick together without squishing the bread.
Step 6: Cut Your Sandwich
You can eat your sandwich whole or cut it. Most people like to cut it in half.
Place your sandwich on a cutting board. Use a clean knife to cut straight down the middle. You can cut it into triangles by cutting corner to corner instead.
Some kids like the crusts cut off. According to a Facebook cooking group, removing crusts is totally fine if you prefer it that way.
Helpful Cooking Tips
Keep Your Bread Fresh
Use bread that’s soft and fresh, not stale. The Kitchn explains that fresh bread tastes better and doesn’t fall apart when you spread.
Store your bread in a sealed bag at room temperature. It stays soft for about 5-7 days.
The Double Peanut Butter Trick
Want to prevent soggy bread? Try this expert tip from Reddit users.
Spread a thin layer of peanut butter on BOTH slices. Then add jelly on top of one peanut butter layer. The peanut butter creates a barrier that stops jelly from soaking in.
Choose the Right Peanut Butter
Natural peanut butter is healthier but harder to spread. Regular peanut butter spreads smoothly and doesn’t separate.
According to Healthline, natural versions have less added sugar. But both kinds work great for sandwiches.
Fun Variations to Try
Classic PB&J
This is the traditional version everyone knows. Use grape or strawberry jelly for an authentic taste.
Wikipedia notes that grape jelly became popular because it was cheap and sweet. It’s been the favorite flavor since the 1960s.
Elvis Presley’s Favorite
Try peanut butter with sliced banana. Some people add honey too.
According to stories on X/Twitter, this was a favorite combination for many families. The banana adds natural sweetness and vitamins.
Grilled Peanut Butter Sandwich
Butter the outside of your bread like a grilled cheese. Cook it in a pan over medium heat for 2-3 minutes per side.
Taste of Home says grilling makes it warm and crispy. The peanut butter gets melty and delicious.
Apple and Peanut Butter
Add thin apple slices for a fresh, crunchy twist. This works great on toast.
The combination provides extra fiber and vitamins, according to nutrition experts at Healthline.
Nutrition Information
Peanut butter sandwiches can be part of a healthy diet. They provide protein, healthy fats, and energy.
According to Healthline, one PB&J sandwich contains about 15 grams of protein. That’s similar to eating two eggs.
The Times of India reports these sandwiches balance carbohydrates, fats, and protein well. This makes them filling and gives you energy for hours.
One sandwich has around 350-400 calories. Using whole wheat bread adds more fiber and nutrients.
Storage Tips
Eating Right Away
Peanut butter sandwiches taste best when fresh. The bread stays soft and the flavors are bright.
If you can, make your sandwich right before eating. This gives you the best texture and taste.
Storing for Later
You can make these sandwiches ahead of time. According to food safety experts, they last 1-2 days in the refrigerator.
Wrap your sandwich in plastic wrap or foil. Keep it in an airtight container to prevent the bread from drying out.
Don’t freeze these sandwiches. The jelly makes the bread soggy when it thaws.
Important Allergy Information
Some people are allergic to peanuts. This is a serious health issue that affects about 1-2% of children.
According to the ACAAI, peanut allergies can cause severe reactions. Always ask before serving peanut butter to someone new.
If someone has a peanut allergy, try sunflower seed butter instead. It tastes similar but is safe for people with nut allergies.
The BBC reports that schools often ban peanut products to protect allergic students. Always check the rules before packing one for school lunch.
Why This Sandwich Is Special?
Peanut butter sandwiches have fed families for generations. They’re quick, affordable, and satisfying.
During World War II, soldiers ate these sandwiches because they didn’t spoil easily. After the war, Epicurious notes that PB&J became a lunch box staple across America.
Today, people share creative versions on Reddit and other social media. Everyone has their own favorite way to make it.
Final Thoughts
Now you know how to make a perfect peanut butter sandwich. It’s simple, delicious, and takes less than 5 minutes.
Start with the basic version, then try different add-ins. You might discover a new favorite combination.
This sandwich works great for busy mornings, packed lunches, or after-school snacks. Share your creation and enjoy every bite!